|

|
Description:
On a eight-foot diameter table covered with white sand, a sequence of a sand mandala created by Tibetan monks and imaged in the nanotech laboratory with an optical microscope and a scanning electron microscope (beyond the visual realm) is projected. These views vary in smoothly in scale, moving from actual size to microscopic views of the surface of a single grain of sand. An entire sequence lasts about fifteen minutes, which is looped to make a continuously changing piece. The ambient sound is made of the audio of monks creating the mandala and chanting mixed with sounds of ocean waves. A live overhead view of this mandala is sent to a monitor or projector at another location, to be decided depending on location.
|
TECHNICAL AND CONSTRUCTION SPECIFICATIONS:
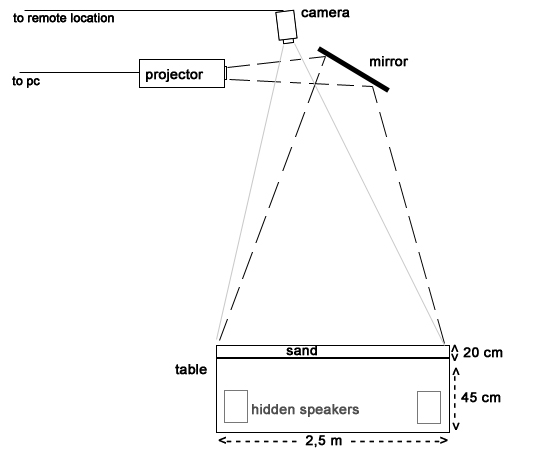
Table: 8 foot diameter made out of wood, 8 inches depth for sand, 18 inches off the ground (speakers go under).
Mirror: For the projector. Size depends on the height of the ceiling. It can be a good quality plexiglass which is not as heavy as glass.
Sand: White
Hardware specifications:
Display Computer: PC minimum P4 processor 2.0 Ghz and 512Mb, running Windows 2000 or XP. Sound card required.
Projector: Minimum 1500 ANSI Lumens, XGA, short throw will be needed in most spaces (ceiling heights 10'- 15'). Currently using Canon LV-7215.
Camera:
Any color surveillance camera with AES (auto-exposure) and more than 320 lines.
Setup:
A reflecting mirror (in order to make total distance from the projector larger) should be installed on the ceiling. The mirror is about 25" square, mounted at a calculated 55 degree angle, and is first-surface mirror like in AM Table above. The projector is mounted from the ceiling using a custom-built adjustable hanging mount.
This installation uses a large AVI movie file that has to be transferred to an external PC drive. Software setup involves proper circular masking (to the edge of the table) of the projection. The movie file is at 1024 X 768 resolution, and the projector resolution should also be the same. You can start the Director application and move the image up, down and sideways using the arrow keys. The image can be made larger or smaller by zooming the projector, throw ratios allowing. Make sure to remove the keyboard after adjustments are made, and also check that the mouse cursor is not in the viewable area.

|